Sunday, September 15, 2013

Pin - It...Hop...& Giveaway

Well, today is my day to post and show what I had made.  I was checking out all the other pin cushion, oh such creativity I seen.  So many great ideas and beautiful projects.  I am in total ahhhh reading them.


Lets give a BIG thanks to   Kristen King and Madame Samm for all their hard work.  It was very much appreciated, believe me!!!

I made a few different projects.  First, I got this pattern from Connecting Threads.  I thought it was sooo cute.  I not only got the pattern, but this time I actually broke down and got the fabric also.  I had a gift certificate and figured, why not.  The fabrics were great prints.  And I got extra so can easily make another

:

The pattern was sooo easy to read and it was a lot of fun to make.  My only difference was that I did not have Walnut shells for stuffing.  I had to go with sand.


Is't it cute?   This is going to be its home, for now.  I have been using it and it really has come in handy already.


Pin Cushions are so much fun to make.  I had to make some more.  I seen a picture in a magazine, but someone stole the full article and instructions :(    But I took a picture of the picture with my phone and decided to make my own pattern.  It was easier than I though, course I am not sure if I got the measurements correct, but did it anyway.  So I made my own pattern and this is what I ended up with:


They work perfectly on the wrist and have pins handy at all times.  They make great Christmas presents.  So I made enough for my nieces and a few cousins.  

Then I drew cats and dogs......OH YEAH!  I couldn't resist.


I just couldn't resist with a little fabric paint and some buttons and a bow.


Oh, now that you have seen mine....lets all go and check out the rest the the beautiful creations of Pin Cushions that also posted today:
September 16


Oh so sorry to say, but only one more day   :(  
 

OK, I know everyone is wound up making pin cushions...I know I am.  I have seen so many beautiful designs that I feel I just must make.  Well, I have a giveaway for you....


This is "The Abbey Bag"  pattern.  When I got mine, I got a second just for you.  I  am giving away this  pattern by Abbey Lane Quilts.  It is an easy fun pattern to make.  And ANYONE  can enter as long as I can contact you.  All you need to do is leave me a comment.  I will continue taking comments (entries) thru Friday.  Saturday, September 21st, I will announce my winner.  I do go to Random.org and let them pick my winner.  

So, good luck to you all and till Saturday,

HAPPY QUILTING EVERYONE!

To get special designed quilts or to see my gallery, check out my site at: http://janesquilting.com

Monday, September 2, 2013

Best Friends House Rules

Did you ever make a Picture Quilt?  You can put anything on fabric sheets.  Letters, Signatures, Labels, Flowers, oh and PICTURES of ANY kind!

As many know, my son and his fiance moved down here to TN near us.  (we were ecstatic) anyway, I made them a special wall hanging for their new home.  You see they have two adorable dogs.

Let me introduce you to Delia:


And Morgan:


They are definitely the best of friends. I just had to make something special for them all.

I had taken lots of pictures and had to pick the best 2........now everyone knows a dog will not exactly sit still for you to take there picture, much less that perfect picture you are hunting for.  But I think I got them.  I cropped, sharpened, edited, etc. and then put the pitcures on a frame.  


Then drew what I wanted to make and the size....and made patterns:


I found the rules from one of my "friends" on facebook.  not sure which one....but I thought they were cute,  So I took each of their pictures and added 2 rules:


I added the letters and bones with Steam a Seam II and then machine appliqued them on using monofilament thread so not to be seen.  Being on a white background, I used a beautiful multi colored batik for the letters. 


Don't they look so innocent?

After I got all my applique sewn on, I added my boarder, layered and quilted.  I outlined all the appliuqe and then the pictures.  Then quilted in the ditch around the frame.  


 Total size is:  25" X 28"


Picture quilts are great.  I love designing them.  Hunting for the right picture, the perfect frame for it, the background, etc.  You can do so many different things.  With some imagination....Anything is possible!!


HAY, EVERYONE READY FOR THE NEXT HOP???
WELL YOU BETTER, NOT MUCH TIME LEFT:


HOPE TO SEE YOU ALL THERE!

Until then:

HAPPY QUILTING EVERYONE!


To get special designed quilts or to see my gallery, check out my site at: http://janesquilting.com

Thursday, August 29, 2013

Hexie Winner Announced

I cannot believe the "Be a Hexie Queen" hop is over already.  How time flies when you're having fun.


                                           NAFCON WOMEN'S MINISTRIES: February 2010


 Thank you so much  Debby and Madame Samm for all your hard work in putting this all together.  It was so much fun.  I learned many different techniques on how to make Hexie quilts.   Not only that but so many different ways to make Hexies and to incorporate them into quilts.  I sure hope you have seen all those beautiful posts.  If you missed any, please go back and catch them all.

Well, I am still working on my Hexies.  I actually made more to make more flowers.  I decided that since I am making a "Grandmother's Garden" quilt....it is going to be big.  It is a very relaxing project and I am in no hurry to finish it.  This one is going to be just for me.  

..


September is right around the corner so that means the heat and humidity will be leaving.  So when I am not in my room quilting, or in the kitchen baking,  you will find me here, enjoying the changing of the seasons with my needle, thread and all my Hexies.


I seen this in our side yard yesterday morning.


I want to thank everyone who commented on my Hexie Queen Wannabe post.  It really makes you feel good that someone actually reads your posts and care enough to take the time to comment. 

I went to Random.org and I got a winner for my two Christmas Angel patterns....


The winner is:    Suze...CONGRATULATIONS!!  I will be e-mailing you shortly to confirm your winning.

 Next hop......Pin Cushion  "Pin It".....


Starts September 10....I am working on some cute little projects.  I can't wait to see what others come up with.  Thanks to  Kristen  and Madame Samm we are all going to get all our pins in order.   See you there,
until then..............

HAPPY QUILTING.EVERYONE!!


To get special designed quilts or to see my gallery, check out my site at: http://janesquilting.com

Thursday, August 22, 2013

Hexie Queen "Wannabe" and Giveaway

Well, today is my day....  YEAH.....I was sooo excited to join this hop.  I always wanted to do Hexies and to learn English paper piecing.   I want to thank Debbie and Madame Samm for all their hard work putting this GREAT hop together.   I am sure I was not the only one who learned a new technique in quilting.

There are quite a few different ways that people make Hexies.  You can applique them on your project, sew them together  by hand or with your machine in rows or you can sew them together by hand.  (I even found that there are different ways to do that also).  Then you can cut them in half...sewing the halfs

You guessed it.....I tried the cutting in half.   First I drew my Hexie as to how big that I wanted it finished.  Then added a 1/4" around the edges.  After that, I cut it in half.  I then added 1/4" to the cut side of the pattern.


I had some pretty scrap fabric that I just adored and wanted for in my sewing room.  So I decided to make a mug rug.  I cut out my half Hexies and arranged them how I wanted to sew them together.

Here comes the fun part.    You see at the same time I was making my first project, my son talked my husband and I into getting "Smart Phones".  We had a regular old phone all our lives and had NO idea as to what we were getting into.  Anyway, We went on a family plan with him and his fiance and he was showing us how to use our phone.  They are great with all our questions, I never knew I could do so much with just a phone.  He said, take your pictures with the phone and they will be much clearer than your camera.  They sure were....until the phone locked up, no one knew the so called "password".  So it had to be renewed   No problem, they told me, but they forgot to tell me that it would loose all my pictures cause I didn't have this "SD Card" ???  (Got one now, but lost some good pictures)  Glad I still used my camera.

So unfortunately, I cannot show complete steps on how I put it together.

 I laid them all out to where I wanted them to be when finished.  Next I sewed them in rows.


When my rows were all sewn, I sewed the rows together.    This time though, I did my edges different.  I layered then at this time and carefully sewed the edges on two sides together. ( I left the two ends open.)  Then carefully made a snip in each inner seam.  This made a neat Hexie when I turned it right side out.


After I turned it right side out, I sewed my two ends shut by hand and machine quilted in the
ditch.


It is the size of a mug rug but  instead of using it for that,  I sat my lamp on it in the corner of my desk. Fits perfectly!  What do you think?


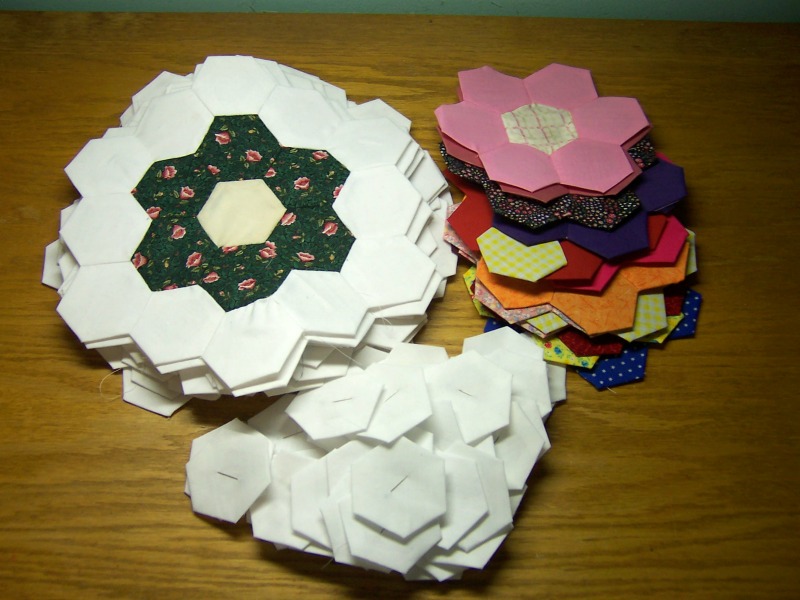
OK, this was fun but I had lots of time before the hop, so I decided to give English piecing a try,  I found this way to work for me:  First I made lots of plastic patterns. ( 1 1/2" ) then cut lots of scrap fabrics to make flowers for my quilt.  I added an extra 1/4 inch when cutting them out.

\

The next step was to pin the plastic onto the fabric in the center and carefully turn under 1/4 inch and tack each corner with needle and thread.


This made it so easy to take anywhere I want to go.  After I made lots of assorted fabrics and lots of white, it was time to start sewing them together.  I kept the plastic in until all 6 sides are sewn on.  (the plastic does make it look bunched up but after it is removed and all press, they lay nice and flat)

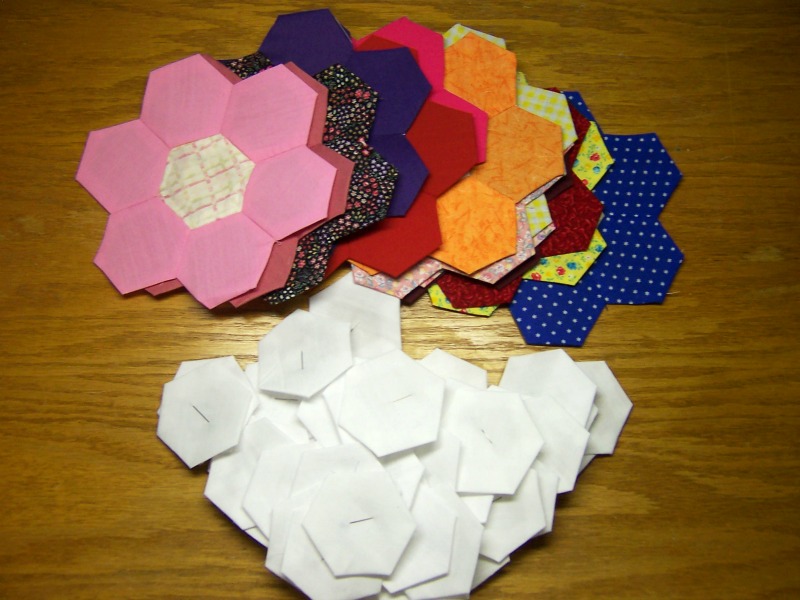
Well unfortunately, I kinda got carried away, I made lots of Hexies and decided to make a full bed size quilt.  They are a lot of fun to make and can be so relaxing.  But I didn't want to rush and not do a good job.  I have been working on it after supper sitting on my swing, enjoying the evening after these long summer days.  Unfortunately, by that time of day, I am beat!   So I did not get them all finished.  I have these:


I have 14 of these large flowers above.


I have another 14 flowers ready to put white hexies on.
AND
I have more cut and ready to pin on plastic to make MORE flowers. 
I now have a UFO to do in my spare time.
(gee what spare time??)

OK....Lets all go see all the other beautiful Hexie Queens, here is the list for today:

Friday, August 23

Sew Peace to Peace


Next week schedule:

Monday, August 26


Nunu’s Quilt World

Tuesday, August 27


Marjorie's Busy Corner   


Oh, did I mention I have a giveaway too?  Our last hop with Madame Samm was the HO HO HO and I got so many ideas and projects lined up, I just had to share.

I had gotten some patterns to make Angels.  When I did, I picked up 2 extras.


The Winter Angel on the right is 14 inches tall when completed and the Santa Angel will be 15 inches tall when completed.  Both patterns are May Kerr designs.  They are both brand new, complete easy instructions.  Both are lots of fun to make.

To enter just leave me a comment.  This giveaway is open to anyone, as long as I can contact you.  I wish everyone lots of luck.  I will let random.org pick the winner and it will be announced on August 29th.

So, till then........

HAPPY QUILTING EVERYONE!

                            Pin Eugene Of Tangled Cake on Pinterest

To get special designed quilts or to see my gallery, check out my site at: http://janesquilting.com

Saturday, August 10, 2013

OH NO.....HO HO HO is Over,


What a GREAT hop this was!   Thank you so much Carol and  Madame Samm and Carol for all your hard work.  We have been having such a HOT summer that it made it so much more fun making Christmas items.   Checking out all the other projects that other quilters have posted.  I am sad to see it end.  But in no time as all we will be getting out these projects and decorating our homes with them.  We are going to be so festive.  


I not only am going to hang my new wall hanging but I got some new stocking to hang also:


Then a set of placemats for our table:


I also found this cute snowman for a centerpiece.  You should see him rock and sing..

.
Oh, he sings "Sleigh Bells"  and then dances and jerks his head all around.
I tried to take a movie, either I don't know how or my camera won't download.

I know I will be making more for Christmas....it is my favorite time of year.


As for the winner of the 6 beautiful Christmas Fat Quarters and "What a Deal Purse Card" Pattern, from "The Sewing Basket".....


I talked with Cheryl and she is ready for a winner.  So I went to random.org to make it equal for everyone.  It chose: 
                                     ABBIGAL   

I will be sending you an email shortly for verification.


CONGRATULATIONS and a BIG THANK YOU to  "The Sewing Basket" for their wonderful prize.  

Till next time.....

HAPPY QUILTING EVERYONE!            


To get special designed quilts or to see my gallery, check out my site at: http://janesquilting.com

Sunday, August 4, 2013

HO, HO, HO, A Quilting I Did Go....

HO, HO, HO, It is my day to show what I made....Boy did I think out of the box this time!  I was asked one time if I was one who colored outside the lines.  Well, you ask my mom and she will tell you, "All the time!"

Before I show you what I did, I want to give a big thank you to Carol at Just Let Me Quilt  and Madame Samm for coming up with this idea of a HO, HO, HO hop and also for all their hard work.  It sure is appreciated by all of us.


                                                        Rolvenden Cat Rescue » Highlights of 2012
                         

OK, guess you are all wondering what I came up with.  First let me tell you that it has been a HOT summer so far.  I truly don't want to complain though.  My family is healthy, the garden is doing great, my flowers are beautiful, I am busy, busy, and ready for a

                                          Vacation Preparedness: How to prepare when on a vacation « Austin CERT

Keeping that in mind........Wouldn't Santa be thinking the same thing???

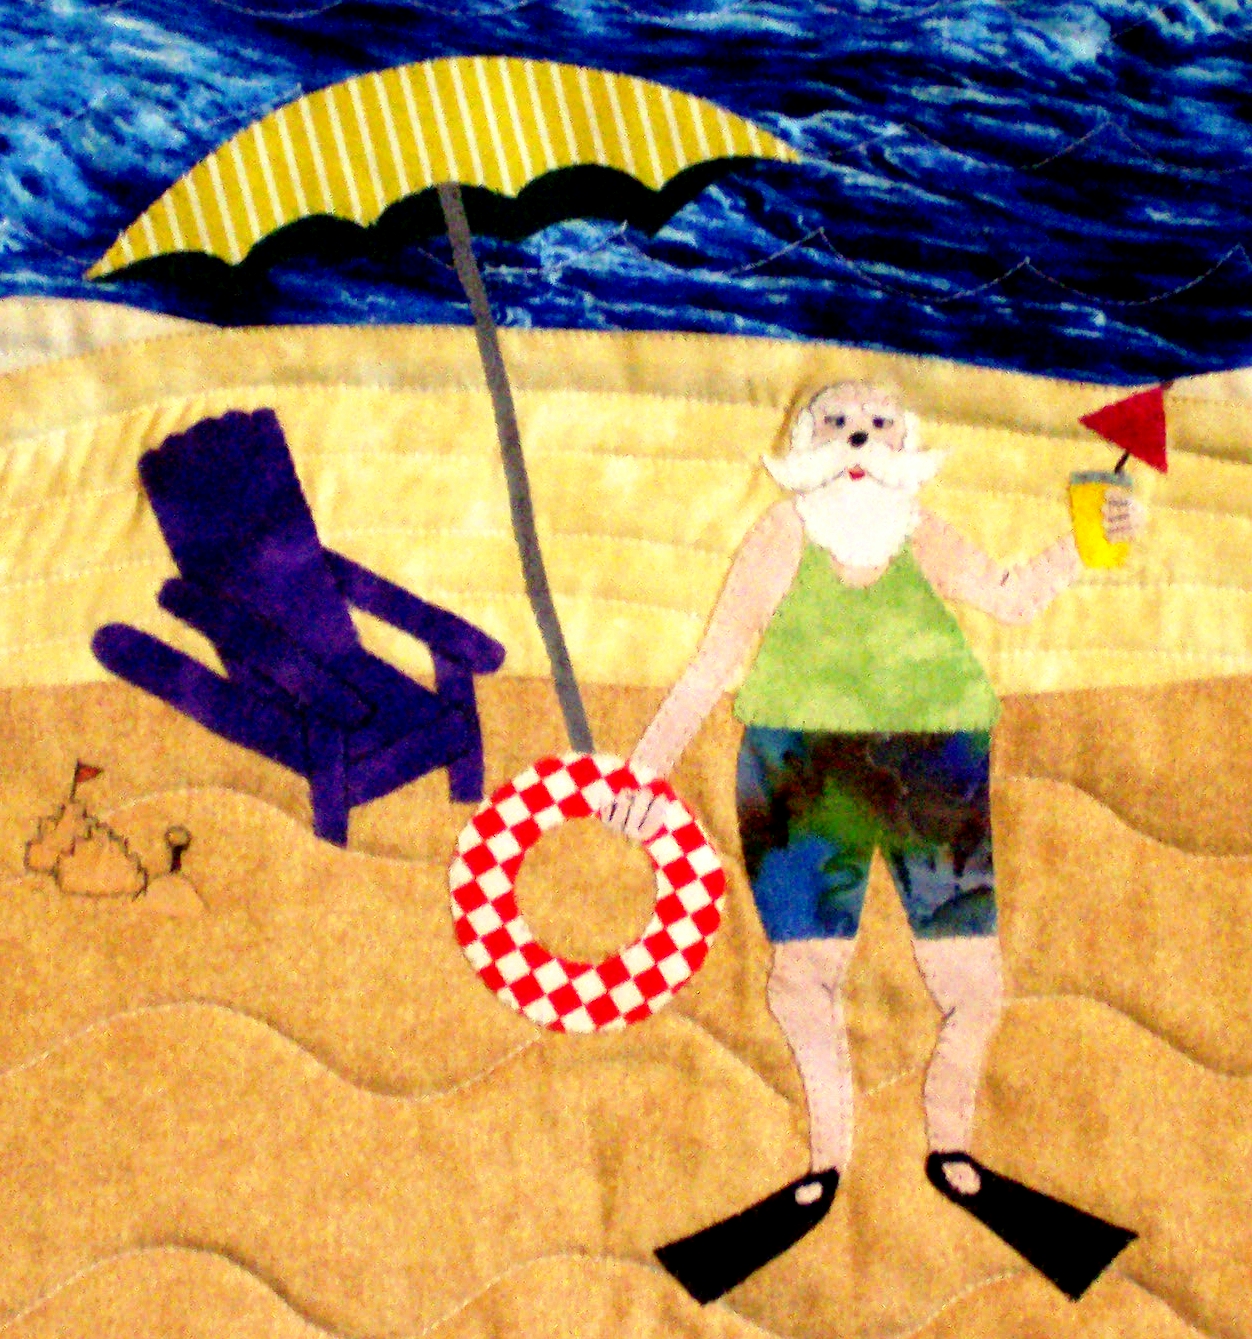
Well, I decided to draw Santa on a Tropical Island on Vacation, having fun and enjoying his summer off.


I started out with just having him on the beach, but wanted to try something different.  I had no drawings, or grafts, or even ideas.   I just went with what I felt at the time.  I wanted to make it look like he was on a Tropical Island (as best I could) So I found these fabrics for landscaping.


 I picked out different fabrics and laid them out in kid of the order I thought I would like.  Then pressed what I wanted and then made my curves and folded down the edges where I thought they would look good.


(Once I made a curve, it was easy to keep re-creating it)  I knew that when layering fabric for landscaping, the layers in the distant should be close and the foreground further apart, to give it the illusion of perspective.

I did one layer at a time, putting them where I wanted and pinning in place with flower head pins so they laid flat. 


After I had all my pieces where I wanted them and pinned in place, it was time to sew them on.  When I sewed my layers, I started with the last layer I put on.  I used monofilament thread so not to be see and stitched close to the fold.


After all the layers were sewn on, I trimmed (squared) and put my applique where I wanted, pressed in place and machine appliqued on.  After the applique was sewn on, I put my frame on (boarders).  I decided to use my brighter Timeless Treasure Batiks.  (since it is to be summer, hot and on a Tropical Island)

I quilted it with my machine, trying to emphasize the landscape and sun in the sky. Sewed on my binding, painted some detailing in the sand, face, sailboat.  Total size:    22" X 24".


OK, I know this is probable not what was expected, I did make another:


Below is the list of all the other HO, HO, HO posts for today.   I can't wait to see what they did.  Grab a cup of coffee and come join me,

August 5

HERE IS THE LIST FOR THE REST OF THE WEEK:


This is a company that has their own beautiful patterns for bags, toppers, etc.  Not to mention the beautiful fabric choices (and GREAT prices), Plus they have a full line of "Floriani" Embrodery patterns.

So, to enter, be a follower of mine and leave me a comment.  Go to "The Sewing Basket" and sign up for their newsletter "Nuts and Bolts".  While you are there, be sure to visit their free stuff and i.  nfo page.  They  also have some terrific classes.  For a second entry go to their facebook page and "like"

This contest is open to anyone, anywhere, but please make sure you have an e-mail for me to contact you.  I will keep it going all week.  Saturday, August 10th, I will go to Random.org and let it pick a winner and post it.

Good luck to you all.....

HAPPY QUILTING EVERYONE!