Saturday, August 27, 2011

My Crazy, Sampler, Reversible Quilt

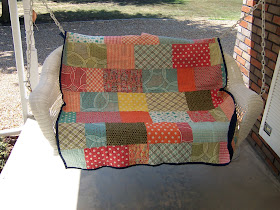
This is a Crazy, Sampler, Reversible Quilt that I made for my swing on our front porch.  I have been working on and off on this while doing other projects. I took my time and did one block at a time to mix match the material.  I had other projects that were more important to do.  But I finally got it finished.  This quilt was made with bright Moda Fat Quarters that I purchased at Hancock's in Paducah.


I tried to pick different blocks, ones that I never did before, also some of my favorites, plus they had do look good together.  I added plain dark blue fabric here and there in the blocks to set them off.


I even mixed up the boarder around the blocks and placed them on a slant, then put a white sashing.


I machine quilted 1/4 inch around parts of each block to set them off and then put a fancier stitch in the boarder.  For the backing I used all my large scraps from the front that were left over.  So it actually looks good either way.


Looks good on my swing, to me adds that finishing touch.  The finished size is 50" X 50", to me, the perfect lap quilt for when the weather gets cooler.  My hubby and I will still be able to swing. 


Happy Quilting......Have a Great Day!!


Check my website gallery for more selections: http://janesquilting.com

Wednesday, August 24, 2011

Triplet Placemats

I did it, I made another set of placemats for Fall.  These are called Triplets because each consists of 2 sets of three different kinds of fabric.


I seen this deign in one in my latest magazine but  they made theirs a little different and different material.  Since mine is a different size, I had to make my own pattern.  They were easy to make, I felt it was the perfect opportunity to use some of my larger printed fall material.  (I used this material for a boarder in other projects that I did earlier.)  I just cut 12 pieces of Sunflower print and 12 pieces of plain light tan that matched my print.  I sewed 2 plain and one print in the middle, then 2 print with a plain in the middle.


Then sewed the two rows together matching the points. After sewing them all together, I used the same plain tan material for the backing.  I layered them and quilted them with my machine using the stipple pattern all over.  Trimmed and added a gold binding with the machine using the blanket stitch and invisible thread.


Placemats are easy to make, but remember whatever you do to one, you must do to all four.  But it is worth it.  (I always do mine by machine, that way they are not only for show but able to be used and washed.)


Happy Quilting Everyone,  Hope everyone is having a Great Day!


Check my website gallery for more selections: http://janesquilting.com

Friday, August 19, 2011

My First Quilt


I started quilting the fall of 2004.  It was something that I had always wanted to do, but never had the opportunity, with work, family, etc.


I had no idea as to where to start.  No one in my family ever quilted.  We moved to the Peninsula in VA about a year ago and there were no quilt shops, nor fabric shops.  I only had the internet, but was on dial-up, so could not get any tutorials, oh, we did have a Wal Mart.   Then a friend of mine gave me a book from the 60’s on different blocks, when she was on vacation.  Her and her husband came down to the island of Chincoteague every summer.   She was an older woman that liked getting panels and sewing them together.  The book only gave a picture of the blocks and their names.  There were no instructions on putting them together.  I looked through that book over and over, checking each page out carefully.  My husbands only comment was that if I was going to make a quilt, make it a large bed size that we could use.


I picked one that did not look too hard, it only had 4 pieces.  I picked the hour glass block to make and off to Wal Mart I went for material.  They didn’t have a big selection, so I got ½ yards of all different kinds of prints that would match.    I also picked up a ruler, square, mat, and rotter cutter.


When I got home, I set everything up on our dining room table and started cutting my triangles.  Until the quilt was together....we ate in the kitchen.  (My husband did not mind, he was very supportive and is to this day.  he is my biggest fan.)   I had no idea that I was to give an extra ½ inch to the triangle to make an 8 inch square, much less did I know about making half square triangles.  So, I had a few problems with the points matching, and my squares ended up 7 inch instead of 8 inch.  Plus, my machine was old and did not have the ¼ mark to follow, so I drew a line with a marker to follow.  But that was ok, I was doing it and having fun!


After I got all my blocks made, I laid them out in rows and marked each row as to which order I wanted to sew them together.  I cut little pieces of paper and numbered them.  (row 1, row 2, etc.)  At that time I also decided to put a sashing between the blocks.  So far so good, I just took my time.  Now, unfortunately, I stopped reading for I was to into sewing.  


It took almost a month for me to get all my blocks squared and the points all perfect.  I now had the top all complete and ready to be layered.  


My table was not long enough for me to layer, so I laid the bottom on the floor in my bedroom. I sprayed lightly  with an adhesive spray, then put the batting on top, being very careful to smooth it all out.  Then spayed the batting and laid my top on, again smoothing it out.   Now, it is a good thing that I got that fabric spray, for I did not know to baste the whole quilt.  I only basted the edge.  And it actually stayed all together for me to quilt.

My husband and I are ones to go to Flea Markets and Yard Sales together on weekends.   I was now on the look out for anything that had to do with quilting.  Fortunately I found a large used  quilt hoop at one of the  flea market and it worked perfect.  I was able to sit in my living room, watch TV and hand quilt my quilt.  It took me 3 months to quilt the whole  top.  I quilted it ¼ inch from all the seams.  Binding, I read to cut on the bias.   I made mine extra wide and hand sewn on carefully.  WOW...I MADE MY FIRST QUILT!!!
                                         Total size:   96" X 86"  

While I was quilting this quilt, I subscribed to 2 different magazines, and started reading what ever I could get my hands on that had to do with quilting. I even found a quilting show that was on early every Saturday morning.  I taped every single episode to watch a few times over.  I wanted to learn everything I could so my future quilts would go together more smoothly.  Hopefully with a lot less ripping.

Reading all that I did and checking out other peoples articles and quilts that they have made.  I found that most people buy a pattern and stick to it, but  use different material.  I learned how to match different blocks together.  How to re-size my blocks and patterns.  I read all about applique.  (Unfortunately, my machine was too old to do any stitch except the straight stitch front and back)  I got a notebook and started making notes on ever different technique I found.  That way I could keep them in order and have my own personal guide. I also started a smaller notebook as to what I would like to make.  I called it my "Dream Notes".  

My second quilt was the Dresden Plate which I hand pieced and hand quilted.  That was a  lot of fun.  I enjoyed doing applique, and wanted to learn a lot more.  It was after that quilt, that I stared designing my own quilts.  When we moved to TN, my husband  bought me a new Pfaff quilting machine.  That is all it took, I was off and running, and no one was going to stop me.   I started to learn how to machine quilt, but only with my table toppers and wall hangings.  As for my large quilts, I was still hand quilting.

To this day, when I see a quilt or pattern, I like, I just have to make it my own, by doing something different with it.  I still never purchased a pattern, I like to try to figure the quilt out myself.  I am still collecting books, and magazines and reading as much as I can to learn more.


Last year my husband purchased a long arm machine for me for my birthday.   (ahh yes, see, he really is my biggest fan)   I do not do as much hand work as I did.  My notebook, well, it is still growing.  I still find different techniques to put into it.  I also have a large notebook on all my quilts that I ever made.  I keep notes on them, pictures, etc.  Oh, and as for my "Dream Notes"..... I now have a small one with me at all times that I write down ideas, I even draw pictures in it.  There is a large one in my room that is just full of ideas, You all know how that goes........

So many things, so little time.

I would love to hear about your first quilt and how you got started in quilting.

Hope everyone has a great weekend. 


Check my website gallery for more selections: http://janesquilting.com

Tuesday, August 16, 2011

Come on In

It looks like the Ghosts are having a party tonight......


I wanted to make something fun and different this past weekend.  So I decided to go with a Halloween theme. I was thinking of making a silhouette of a haunted house scene but wanted to add a little color.  This idea would be perfect for Bali material.  So I picked these to start with:


Then I drew a haunted house with a Ghost coming out the upstairs window and one opening the front door for their friend coming up the sidewalk.  I cut out my applique and decided how big I wanted to make the full wall hanging.


I sewed the sky and the grass together to make the house look like it will be up on a hill.  Then arranged my applique onto it.  I put the tree along the boarder and added a fence.  The full moon was placed just off to the side a little with bats flying around.  And of course, I had to have a witch flying on her broomstick.


When I got all the applique where I wanted, they got press and machine stitched all around the raw edges with the blanket stitch and invisible thread.  Put my boarder on, layered and pinned.  I then machine quilted echoing all around the appliques and in the ditch in the boarder.  Then put a binding on using the same material as the boarder.  This was also sewed on by machine using invisible thread.  I finished by painting eyes on my Ghosts with black dimensional fabric paint, to make them stand out more.


The finished size is22" X 25".  I added a sleeve on the back and it is ready to hang for Halloween.

Next......I started a new quilt, wait till you see it.       Hope everyone has a Great Day!


Check my website gallery for more selections: http://janesquilting.com

Friday, August 12, 2011

Circle of Sunflowers

As all quilters, I have a notebook of all the previous quilt projects that I have completed and another for project and ideas that I would like to make.  But as I got that notebook out to get an idea as to what I wanted to make next, I thought of what time of year it was and how all the Sunflowers are in full bloom in so many gardens.  The Sunflowers are the last flowers of the growing season.  Many birds, including the Cardinals, are just waiting for their seeds.

So, I came up with this:


I wanted to bring this picture of the garden into our home.  At this point, I had so many ideas I didn't even stop to design anything on paper.  I just dug into my stash and came up with the material I wanted to use.


 Next I started drawing Sunflowers and Leaves on my Steam-A-Seam, pressed them onto my material and  started cutting them out.  I made 5 flowers and 15 leaves.


Then, laying out the pieces on a table, I started arranging them.   I put the applique Sunflowers in a circle, looked good to me.  I wanted the center to be lighter than the outside, but also did not want the material to take away from the Sunflowers.  The off white center and tan outside seemed to work good.  After I placed the flowers where I wanted I sewed all around the raw edges using the blanket stitch and monofilament thread on my machine.  Then I layered, machine quilted and put the boarder on.  I always like a dark boarder, so brown seemed to set it off.  The finished size is:  19 1/2" X 19 1/2".


I think it looks good on the table.  Isn't it fun to decorate your home with different themes for the seasons?  I think it gives your place that  warm"Homey" feeling.

OK, off to get another idea..........Hope everyone has a "Great Day"!


Check my website gallery for more selections: http://janesquilting.com

Tuesday, August 9, 2011

Coasters

The other day I decided to do something different.  I made coasters with Holiday applique on them.  I am VERY allergic to Wool, so I decided to make them out of Cotton fabric.  they are actually very easy to make.


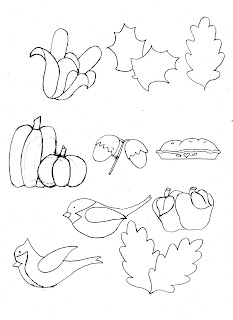
First you need to know what applique you would like.  (You can do most anything you can think of)  Then dig into your scraps.  (That is the best part, finding the right material you want to use)  You will need 2  -  5 inch circles.  One for the tip and one for the bottom.  Then cur a 5 inch circle of batting.  Right now I am making some for Halloween, Fall theme and Christmas.  Here are a few ideas that you could use.....


Next layer your two circles by placing them right sides together.  Then place the batting on the bottom of your circles.  Sew 1/4 inch all around leaving 1 inch open to turn right side out.
Then Press.  The opening  gets hand sewn shut.


Pick your applique, the sky is the limit..  You can even cut out a print from a favorite piece of material (See my Sunflowers).

Cut and place on your top circle, I use Steam-A-Seam II.  Then press in place and machine sew along the raw edges.

                                     WAALAA  COASTERS!!!


I made quite a few for my tables (for drinks, candles, etc.)  You can embellish them any way you would like, paint, crayon, etc.  Just remember that what ever you do, they may have something HOT placed on them.


I hope I was of some help and that you enjoyed my little project.  It is a good way to use up your scraps and make cute little gifts.

Anyone that may be interested in patterns, please let me know.

Thanks for reading and I hope everyone has a Great Day.


Check my website gallery for more selections: http://janesquilting.com

Thursday, August 4, 2011

Fall Placemats

I have made Quilts, Wall Hangings, Table Toppers, but I have never made Placemats.  My thought was they were just four small Wall Hangings that were all alike.  And I didn't have to put a sleeve behind them.  So I decided to make some for a friend of mine that is going to have a birthday soon.


I wanted to make my friend something different and with a birthday in August, why not something for Fall?  Anyway, everyone is tired of the heat by now and ready for some Fall weather.    

Now, I didn't want to make that same ol thing,  It had to have Pizzazz of some kind. So I drew some pumpkins and leaves and dug into my stash for some fall material.  I decided to make a different boarder around the edges.  (my thought is when a plate, silverware and glass is on, you mostly see the boarder anyway).

I made 1 1/2 inch strips of fall prints and 1 1/2 inch strips of solid light tan.  I sewed the two together, then cut 1 1/2 inch wide pieces off of the strips.  Next I sewed 2 together making a 2 1/2 inch block of 4.


Then, I sewed the 2 1/2 inch blocks of 4 together and that was my boarder. It took time, but was well worth it in the end.


 After I got the boarder on all 4 Placemats, I cut out my applique and arranged them onto the placemat in the order I wanted them.  Pressed in place and proceeded to machine applique them on with the blanket stitch.
Then layered, pinned and machine quilted in the grid pattern in the center and in the ditch in the boarder.


I got them all complete in 4 days.  Next is to neatly wrap them and send them on their way.  They are going to look good on her table for Fall.  I hope she likes them.


They were a lot of fun to make, but I learned that instead of using regular batting, to use felt for batting.  That way they will lay a lot flatter and being small will quilt up a lot easier.

To all:     HAVE A GREAT DAY!!


Check my website gallery for more selections: http://janesquilting.com